Interface Builder で TableView と Cell を関連づける手順

基本的に Interface Builder は使わない派なのですが、先日必要に迫られて利用した際に TableView と Cell を関連づけるのに苦労したのでメモしておく。

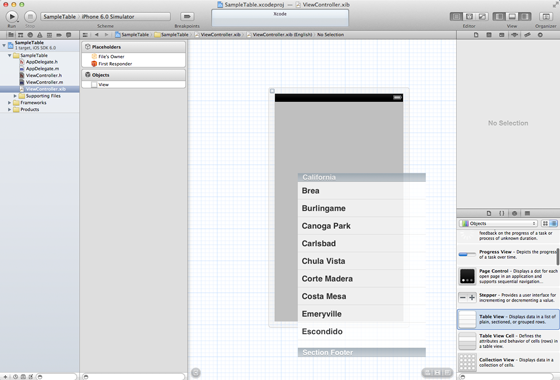
1. Interface Builder で TableView をビューに貼り付ける

1_Interface Builder で TableView をビューに貼り付ける

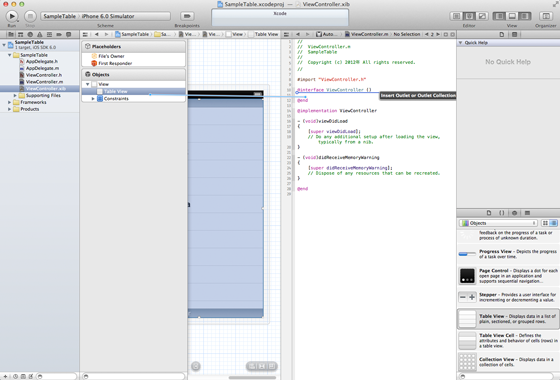
2. Interface Builder のテーブルビューから右マウスクリックでヘッダに IBOutlet 宣言を作成する

2_Interface Builder のテーブルビューから右マウスクリックでヘッダに IBOutlet 宣言を作成する

3_Interface Builder のテーブルビューから右マウスクリックでヘッダに IBOutlet 宣言を作成する

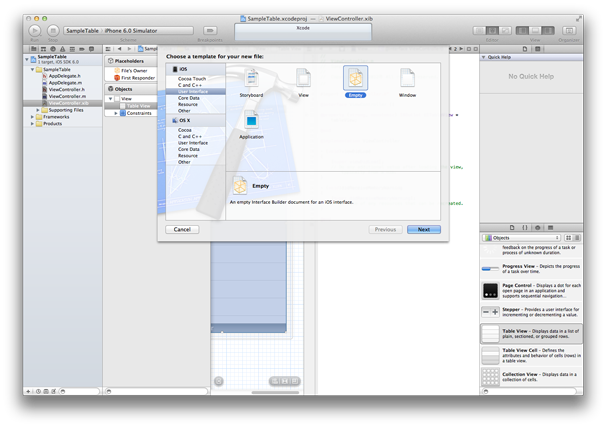
3. Interface Builder で Empty – .xib ファイルを作成し、テーブルビューのセルを作成する

4_Interface Builder で Empty - .xib ファイルを作成し、テーブルビューのセルを作成する

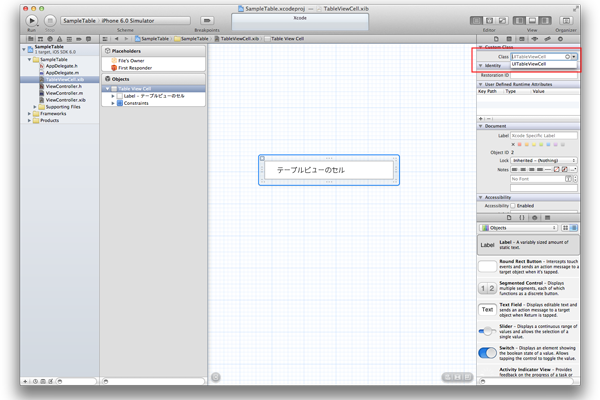
4. Interface Builder でテーブルビュー セルの”Custom Class – Class”を自クラス名を設定する

5_Interface-Builder-でテーブルビュー-セルの'Custom-Class---Class'を自クラス名を設定する

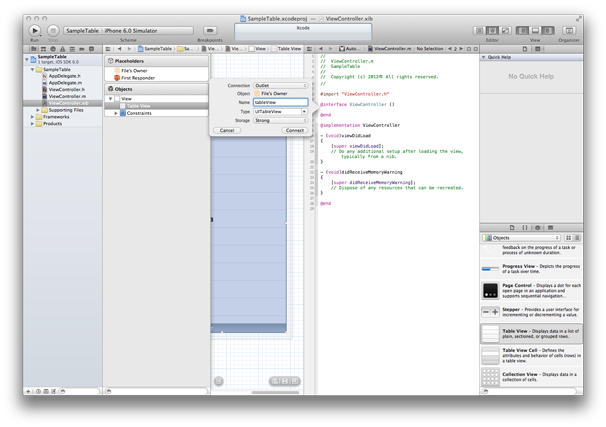
5. テーブルビューの”datasource”を”File’s Owner”に設定する

6_テーブルビューの%22datasource%22を%22File's Owner%22に設定する

6. テーブルビューに表示するデータ配列を作成する
7. テーブルビューのセル クラスを作成する
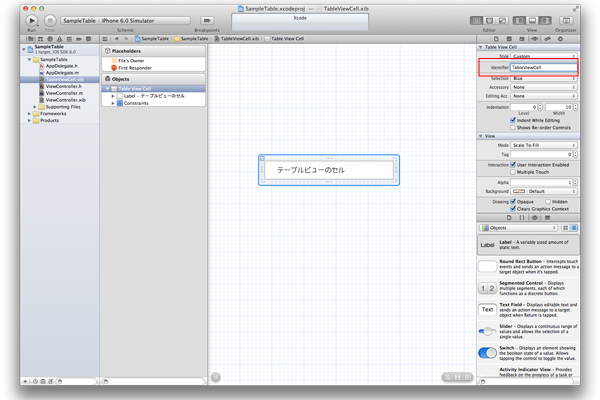
8. Interface Builder でテーブルビュー セルの”Table View Cell – Identifier”をソースコードと同じに設定する

1
2
3
4
5
6
7
8
9
10
11
12
13
14
15
16
- (UITableViewCell*)tableView:(UITableView*)tableView cellForRowAtIndexPath:(NSIndexPath*)indexPath
{
    static NSString* identifier = @"TableViewCell";
 
    TableViewCell* cell = (TableViewCell *)[tableView dequeueReusableCellWithIdentifier:identifier];
    if (nil == cell) {
        cell = (TableViewCell *)[[UITableViewCell alloc] initWithStyle:UITableViewCellStyleDefault
                                                       reuseIdentifier:identifier];
        // リソースが NSArray で取得される
        NSArray *nib = [[NSBundle mainBundle] loadNibNamed:@"TableViewCell" owner:nil options:nil];
        for (id oneObject in nib) {
            if ([oneObject isKindOfClass:[UITableViewCell class]]) {
                cell = (TableViewCell *)oneObject;
                break;
            }
        }

リソースが NSArray で返されるのでクラスを判定して適切なリソースを適用するようにしなくてはならない。
一つの.xib ファイルに複数のリソースを作成できるようなので、このような手順になるんでしょう。

7_Interface-Builder-でテーブルビュー-セルの'Table-View-Cell---Identifier'をソースコードと同じに設定する

注意点

1. .xib と ソースファイルが紐付けられない場合、File’s Owner のクラス名設定が合致していない場合がある

2. this class is not key value coding-compliant for the key
メッセージが表示される場合、Interface Builder の設定に問題がある
オブジェクトの追加、削除を繰り返していると、不要な設定が残っていることがある。

正直、Interface Builder はプログラマにとってあまりメリットが感じられない。
メリットとしては「モックを早く作る」とか「オブジェクトを配置する際の座標を調べられる」程度かと思います。
オブジェクトへの設定などはコードで行った方があとで検索などでチェックしやすかったり、生成処理を統一できたりメリットがあります。
こういうツールって一見便利そうに見えて実は便利じゃないって感じなんですよね。
一応、今風を知っておくということで触ったが、こういうのを抵抗感なく多用できるタイプではないです。(>_<) 適材適所ってやつが重要ですよね。

キーボードに入力領域が重ならないようにする方法

以下の様なテーブル ビューをデザインしたとします。
テーブルのセルにはテキスト フィールドが配置されており、キーボードからの入力が可能とします。

ボタン10のタイトル行などにキーボード入力を行おうとフォーカスを移動すると、画面下部から表示されるキーボードで入力領域が隠されてしまうことになります。

そこで入力領域が重ならないように、以下の様にテーブルを引っ張り上げます。(表現がいまいちですが、通常のスクロールでは移動できない位置にセルを上げ下げします。)
このような表示は、キーボードの表示、非表示時に UITableView の UIEdgeInsets の値を調整することで、編集中セルを画面中央へ移動させることが可能です。
あと、iOS 5 では、日本語キーボードの上部に予測変換候補が表示される仕様となっているようなので考慮しておきます。

手順は、以下の通り
1. UITableViewController でキーボードの通知を取得できるようにする
2. キーボードの表示、非表示に UITableView の UIEdgeInsets の値を調整することで、編集中セルを画面中央へ移動させる

1
2
3
4
5
6
7
8
9
10
11
12
13
14
15
16
17
18
19
20
21
22
23
24
25
26
27
28
29
30
31
32
33
34
35
36
37
38
39
40
41
42
43
44
45
46
47
48
49
50
51
52
53
54
55
56
57
58
59
60
61
62
63
64
65
66
67
68
69
70
71
72
73
74
75
76
77
78
79
80
81
82
83
84
85
86
87
88
89
90
91
92
93
94
95
96
97
98
99
100
101
102
103
104
105
106
107
- (id)initWithStyle:(UITableViewStyle)style
{
    self = [super initWithStyle:style];
    if (self) {
        // Custom initialization
 
        // ソフトキーボードの表示、非表示の通知を登録する
        NSNotificationCenter *center;
        center = [NSNotificationCenter defaultCenter];
        [center addObserver:self selector:@selector(keyboardWillShow:) name:UIKeyboardWillShowNotification object:nil];
        [center addObserver:self selector:@selector(keybaordWillHide:) name:UIKeyboardWillHideNotification object:nil];
    }
 
    return self;
}
 
- (void)dealloc
{
    // ソフトキーボードの表示、非表示の通知を解除する
    NSNotificationCenter *center;
    center = [NSNotificationCenter defaultCenter];
    [center removeObserver:self name:UIKeyboardWillShowNotification object:nil];
    [center removeObserver:self name:UIKeyboardWillHideNotification object:nil];
 
    [super dealloc];
}
 
#pragma mark -
#pragma mark Software Keyboard Mthods
 
- (void)keyboardWillShow:(NSNotification*)notification
{
    NSDictionary *userInfo;
    userInfo = [notification userInfo];
 
    // 1. キーボードの top を取得する
    CGRect keyboardFrame;
    keyboardFrame = [[userInfo objectForKey:UIKeyboardFrameEndUserInfoKey] CGRectValue];
 
    CGFloat keyboardTop = (APP_CONTENT_HEIGHT) - (keyboardFrame.size.height + 55.f );   // 55.f:予測変換領域の高さ
 
 
    // 2. 編集中セルの bottom を取得する
    // テーブル ビューはスクロールしていることがあるので、オフセットを考慮すること
    UITableViewCell *cell;
    cell = [self.tableView cellForRowAtIndexPath:[NSIndexPath indexPathForRow:indexPath_.row 
                                                                    inSection:indexPath_.section]];
    CGRect cellFrame;
    cellFrame = cell.frame;
 
    CGPoint offset = CGPointZero;
    offset =  self.tableView.contentOffset;  
 
    CGRect cellRectOrigin = CGRectZero;    
    cellRectOrigin.origin.x = cellFrame.origin.x - offset.x;  
    cellRectOrigin.origin.y = cellFrame.origin.y - offset.y; 
 
    CGFloat cellBottom = cellRectOrigin.origin.y + cellFrame.size.height + 30.f;   // 30.f:マージン
 
 
    // 編集中セルの bottom がキーボードの top より上にある場合、
    // キーボードに隠れないよう位置を調整する処理対象外とする
    if (cellBottom < keyboardTop) {
        return;
    }
 
 
    // 3. 編集中セルとキーボードが重なる場合、編集中セルを画面中央へ移動させる
    // キーボードの高さ分の insets を作成する    
    UIEdgeInsets insets;
    insets = UIEdgeInsetsMake(0.0f, 0.0f, keyboardTop, 0.0f);
 
    NSTimeInterval duration;
    UIViewAnimationCurve animationCurve;
    void (^animations)(void);
    duration = [[userInfo objectForKey:UIKeyboardAnimationDurationUserInfoKey] doubleValue];
    animationCurve = [[userInfo objectForKey:UIKeyboardAnimationCurveUserInfoKey] integerValue];
    animations = ^(void) {
        self.tableView.contentInset = insets;
        self.tableView.scrollIndicatorInsets = insets;
    };
    [UIView animateWithDuration:duration delay:0.0 options:(animationCurve << 16) animations:animations completion:nil];
 
    // 編集中セルの位置を調整する
    CGRect rect = cell.frame;
    rect.origin.y = cellFrame.origin.y - 300.f;
 
    [self.tableView scrollRectToVisible:rect animated:YES];
}
 
- (void)keybaordWillHide:(NSNotification*)notification
{
    NSDictionary *userInfo;
    userInfo = [notification userInfo];
 
    NSTimeInterval duration;
    UIViewAnimationCurve animationCurve;
    void (^animations)(void);
    duration = [[userInfo objectForKey:UIKeyboardAnimationDurationUserInfoKey] doubleValue];
    animationCurve = [[userInfo objectForKey:UIKeyboardAnimationCurveUserInfoKey] integerValue];
    animations = ^(void) {
        // insets を 0 にする
        self.tableView.contentInset = UIEdgeInsetsZero;
        self.tableView.scrollIndicatorInsets = UIEdgeInsetsZero;
    };
    [UIView animateWithDuration:duration delay:0.0 options:(animationCurve << 16) animations:animations completion:nil];  
}