xcode 多言語対応の方法 (Version 4.6.1)

xcode の多言語対応手順についてメモしておく。
多言語対応の仕組みは知っていたが、いざ実際に行ってみると”Info.list”と”Localizable.strings”ってどう違うの?とか、xcode の ファイルインスペクタ操作などで疑問がでてきたので、まとめた。

1. xcode 設定を多言語対応する
“project” – “Info” の Localizations に “Japanese” を追加する

Localizations_1
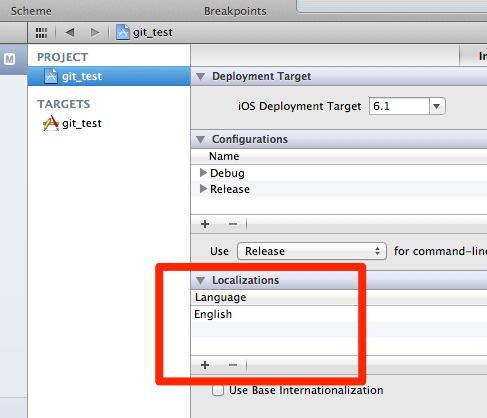
・ローカライズ対象ファイルが多言語対応化される
・English と Japanese 用のファイルが用意される
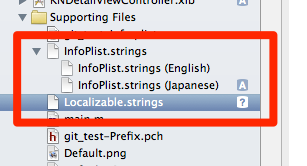
以下のフォルダが作成されてそれぞれに多言語対応されたファイルが格納される
en.lproj
ja.lproj
Localizations_2
例えば、InfoPlist.strings (アプリ設定ファイル) をローカライズすればアプリ名称なども多言語対応することができる

/* Localized versions of Info.plist keys */
CFBundleDisplayName = "日本語アプリ名"; 

2. ソースコードを多言語対応する

書式: NSLocalizedString(@”キー”, @”コメント”)

NSBundle.h に以下のように定義されている

1
2
#define NSLocalizedString(key, comment) \
	    [[NSBundle mainBundle] localizedStringForKey:(key) value:@"" table:nil]

多言語対応例

1
2
3
4
5
// 変更前 (Localizations - English)
self.title = @"Detail";
 
// 変更後 (Localizations - English)
self.title = NSLocalizedString(@"Detail", @"Detail");

3. genstrings コマンドで言語ファイル生成

$ genstrings -a $(find . -name "*.m")

4. Localizable.strings の言語を指定する
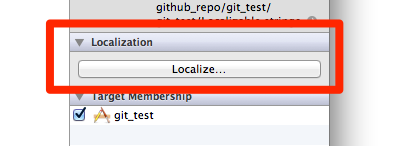
3. で出力された Localizable.strings ファイルを xcode に追加し、言語を指定する
“File Inspector”を表示し、以下のボタンを押下する
Localizations_3
Localizable.strings ファイルの内容 (日本語リソースの場合)

1
2
3
4
5
/* Detail */
"Detail" = "詳細";
 
/* Master */
"Master" = "マスタ";

github の使い方

github からソースコードを取得する際は”ZIP”ボタンを押下していたが、 mac に”GitHub”アプリをインストールしておくと便利だったのでメモしておく。

github からソースコードを取得し、更新する手順

1. github ユーザを作成する
2. github リポジトリを作成する
github_1_create_repo
3. github リポジトリをローカルに clone する
github の “Clone in Mac”ボタンを押下する
mac にアプリの”GitHub”をインストールしていると Clone する場所を聞いてくるので、指定する

github_4_clone
4. ローカル リポジトリにファイルを追加(もしくは、ファイル内容を改変)する
5. github リポジトリに push する
github_7_commit

cupertino のインストールに失敗した際の対処方法

(nokogiri のインストールに失敗した際の対処方法)

https://github.com/mattt/cupertino
cupertino を利用するとコマンドラインから apple のデベロッパーセンターへアクセスすることができます。
というわけで、早速、cupertino をインストールを試みたが失敗したので、対処した際のメモ。

1. (問題) cupertino のインストールに失敗

$ sudo gem install cupertino

以下のメッセージが出力されて失敗していた。
---------------------------------------------
$ sudo gem install cupertino

Building native extensions.  This could take a while...
ERROR:  Error installing cupertino:
ERROR: Failed to build gem native extension.

/System/Library/Frameworks/Ruby.framework/Versions/1.8/usr/bin/ruby extconf.rb
checking for libxml/parser.h... yes
checking for libxslt/xslt.h... yes
checking for libexslt/exslt.h... yes
checking for iconv_open() in iconv.h... no
checking for iconv_open() in -liconv... no
checking for libiconv_open() in iconv.h... no
checking for libiconv_open() in -liconv... no
-----
libiconv is missing.  please visit http://nokogiri.org/tutorials/installing_nokogiri.html for help with installing dependencies.
-----
*** extconf.rb failed ***
Could not create Makefile due to some reason, probably lack of
necessary libraries and/or headers.  Check the mkmf.log file for more
details.  You may need configuration options.

Provided configuration options:
	--with-opt-dir
	--without-opt-dir
	--with-opt-include
	--without-opt-include=${opt-dir}/include
	--with-opt-lib
	--without-opt-lib=${opt-dir}/lib
	--with-make-prog
	--without-make-prog
	--srcdir=.
	--curdir
	--ruby=/System/Library/Frameworks/Ruby.framework/Versions/1.8/usr/bin/ruby
	--with-zlib-dir
	--without-zlib-dir
	--with-zlib-include
	--without-zlib-include=${zlib-dir}/include
	--with-zlib-lib
	--without-zlib-lib=${zlib-dir}/lib
	--with-iconv-dir
	--without-iconv-dir
	--with-iconv-include
	--without-iconv-include=${iconv-dir}/include
	--with-iconv-lib
	--without-iconv-lib=${iconv-dir}/lib
	--with-xml2-dir
	--without-xml2-dir
	--with-xml2-include
	--without-xml2-include=${xml2-dir}/include
	--with-xml2-lib
	--without-xml2-lib=${xml2-dir}/lib
	--with-xslt-dir
	--without-xslt-dir
	--with-xslt-include
	--without-xslt-include=${xslt-dir}/include
	--with-xslt-lib
	--without-xslt-lib=${xslt-dir}/lib
	--with-libxslt-config
	--without-libxslt-config
	--with-pkg-config
	--without-pkg-config
	--with-libxml-2.0-config
	--without-libxml-2.0-config
	--with-libiconv-config
	--without-libiconv-config
	--with-iconvlib
	--without-iconvlib
	--with-iconvlib
	--without-iconvlib
	--with-iconvlib
	--without-iconvlib
	--with-iconvlib
	--without-iconvlib

Gem files will remain installed in /Library/Ruby/Gems/1.8/gems/nokogiri-1.5.9 for inspection.
Results logged to /Library/Ruby/Gems/1.8/gems/nokogiri-1.5.9/ext/nokogiri/gem_make.out

2. (対処方法)

  1. cupertino インストール中に上記のエラーが出力されていたので、以下の URL で対処方法を調べたところ、nokogiri をインストールするには、libxml2, libxslt をインストールしておく必要があるとのこと。
    これらをインストールしてから、再度、cupertino のインストールを試みたがエラーが出力されたので、
    その他の方法を探した。
  2. http://nokogiri.org/tutorials/installing_nokogiri.html

    $ sudo port install libxml2 libxslt
    $ sudo gem install nokogiri
  3. 以下のコマンドを実行してから、cupertino をインストールすると成功した。
    $ sudo gem install nokogiri -- \
    	--with-xslt-dir=/usr/local/Cellar/libxslt/1.1.26 \
    	--with-xml2-include=/usr/local/Cellar/libxml2/2.7.7/include/libxml2 \
    	--with-xml2-lib=/usr/local/Cellar/libxml2/2.7.7/lib \
    	--with-iconv-dir=/usr

CocoaPods の利用方法

1. インストール方法
$ sudo gem install cocoapods

– CocoaPods で利用可能なライブラリ情報を取得する
$ pod setup

(メモ) gem のバージョンが古い場合は、アップデートする
$ sudo gem update –system

2. 新規プロジェクトを作成する方法
– 任意のディレクトリに xcode プロジェクトを作成する
(プロジェクト名).xcodeproj と同じディレクトリに Podfile を作成する

– Podfile の書式:pod ライブラリ名 バージョン指定

platform :ios, "5.0"
pod 'JSONKit', '~> 1.4'
pod 'BlocksKit'
pod 'FTUtils'
workspace '(アプリ名).xcworkspace'
xcodeproj '(アプリ名).xcodeproj'

参照: cocoapods.org

– podfile に記述されたライブラリのインストール
$ pod install

– 自分で作成したプロジェクトと Podfile で指定したライブラリを格納した workspace ファイルが作成される
– CocoaPods が、ライブラリのリンク設定を行ってくれるので助かる。(^^)

ビルド時にエラーが出力されるようなら以下の点を確認する。
・ライブラリが利用している framework の設定

– CocoaPods がサポートしているライブラリは以下を参照のこと。
参照: CocoaPods/Specs