“Application windows are expected to have a root view controller at the end of application launch” がログに出力された場合の対処方法

iOS 4 以降は、UIWindow の rootViewController プロパティで、ビューコントローラを直接指定する方法が推奨されているとのこと。
iOS 6 SDK で以前の方法を使うと、画面の回転が正しく効かないなど不具合の原因となるらしい。

1
2
3
4
5
6
7
8
9
10
11
// iOS 6 以降の推奨
- (BOOL)application:(UIApplication *)application didFinishLaunchingWithOptions:(NSDictionary *)launchOptions
{
 :
(省略)
 :
    self.window.rootViewController = [[UINavigationController alloc] initWithRootViewController:(UIViewController を指定する)];
 
    [self.window makeKeyAndVisible];
    return YES;
}

参照: 既存プロジェクトの iOS 6 SDK 移行

xcode のエディタでカレント行に色を付けるプラグイン

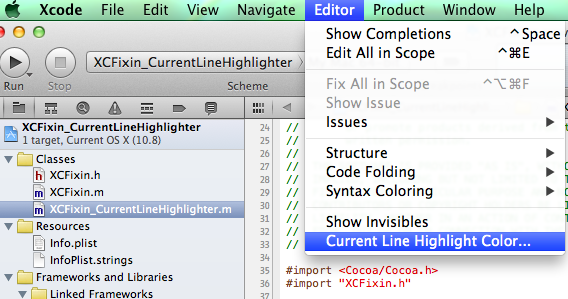
xcode のエディタでカレント行をハイライトさせるプラグインが紹介されていたので、早速使ってみた。

参考:xcode-4-Fixins | Cocoaの日々情報局

設定手順
1. https://github.com/davekeck/Xcode-4-Fixins より、xcode-4-fixins を取得する
2. XCFixin_CurrentLineHighlighter プロジェクトをビルドする
3. xcode を再起動すると以下のメニューが表示されているので選択する
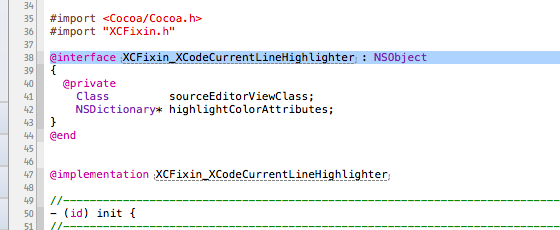
4. カレント行に付ける色を選択すると以下の様にエディタでカレント行に色を付加することができる

プラグインがインストールされる場所:
/Library/Application Support/Developer/Shared/Xcode/Plug-ins

– プラグインがインストールされると xcode にメニューが追加される
current_line_highlight_color1

– コード エディタのカレント行に選択した色が表示される
current_line_highlight_color2

UDID の書式がシュミレータ バージョンによって変わる件

今後、UDID を利用した処理というのは推奨されないことは理解してますが、過去のアプリでは結構使っちゃってますよね。
先日、UDID を利用したコードで、バージョン違いのシミュレータの動作が違うという現象に遭遇し、少しはまったのでメモしておきます。

6.0 シミュレータで UDID を取得した場合 (英小文字。ハイフンがない)
1122bfxxxb4xxx4b33xxx44xxx55xxxa00000000
 
5.1 シュミレータ (英大文字。ハイフンあり)
1122BFXX-XB4X-XX4B-33XX-X44XXX55XXXA
書式:8桁-4桁-4桁-4桁-12桁

UDID をそのまま比較するという処理がある場合、比較できません。(ノД`)

ネットワークの接続状態を取得する方法

ASIHttpRequest が Reachability を利用していたので、存在は知っていたが ARC 版が無くて困ったので、メモ。

Reachability の ARC 対応版を公開している人がいるみたい。
あと、Reachability で通信状態を取得するという使い方は知っていたが、通信状態が変化した際にコールバックさせることもできるみたいなので、メモしておく。

何だかんだで、自分でも ARC のコード書くようになっちゃったなぁ~。あと、blocks とかも見なくちゃいけなしぃ~。GCD とかも見てる。私は特に必要がなければ、 NSOperation がいいなぁ~。(^^)

・参考サイト: TORQUES LABS Reachability:iOSでネット接続を確認する公式ライブラリ
・ソース公開: Reachability (iOS) ARCified — Gist

1
2
3
4
5
6
7
8
9
10
11
12
13
14
15
16
17
18
19
20
21
22
23
24
25
26
27
28
29
// 通信状態が変化した際に通知されるように設定する
- (void)reachabilityStart
{
    curReachability_ = [Reachability reachabilityForInternetConnection];
    [curReachability_ startNotifier];
 
    [[NSNotificationCenter defaultCenter] addObserver:self
                                             selector:@selector(reachabilityChanged:)
                                                 name:kReachabilityChangedNotification
                                               object:nil];
}
 
- (void)reachabilityStop
{
    [curReachability_ stopNotifier];
    [[NSNotificationCenter defaultCenter] removeObserver:self name:@"kReachabilityChangedNotification" object:nil];
}
 
// ネットワーク接続の状態が変化した際の処理
- (void)reachabilityChanged:(NSNotification*)note
{
    Reachability* curReach = [note object];
    NSParameterAssert([curReach isKindOfClass: [Reachability class]]);
 
    NetworkStatus netStatus = [curReach currentReachabilityStatus];
    if (netStatus != NotReachable) {
        // 通信が再確保された際の処理
    }
}

条件に合致する文字のみ取得する方法

テキストフィールドなどから入力された文字列より、条件に合致する文字を取得する場合に正規表現を使えれば便利だなぁ~と調べるとやはりありました。

1
2
3
4
5
6
7
8
9
10
11
12
13
14
15
16
17
18
19
20
21
22
23
24
25
26
27
28
29
// 入力された文字列から"全角ひらがな"、"全角カタカナ"のみ取得する
- (NSString *)getHiraganaKatakana:(NSString *)inString
{   
    if ([inString length] == 0) {
        return @"";
    }
 
    // 正規表現オブジェクトを作成する
    NSRegularExpression *regexp;
    NSError *error = nil;
    regexp = [NSRegularExpression regularExpressionWithPattern:@"[ぁ-んァ-ン]" options:0 error:&error];
    if (error != nil) {
        NSLog(@"%@", error);
        return @"";
    }
 
    NSArray *checkingResultArray = [regexp matchesInString:inString options:0 range:NSMakeRange(0, inString.length)];
 
    NSMutableString *outString = [NSMutableString string];
 
    for (NSUInteger i = 0; i < [checkingResultArray count]; i++) {
        NSTextCheckingResult *checkingResult = [checkingResultArray objectAtIndex: i];
        if (checkingResult) {
            [outString appendString:[inString substringWithRange:[checkingResult rangeAtIndex:0]]];
        }
    }
 
    return outString;
}

入力された文字が数値か判断する方法

入力された文字が数値かどうか?判定する処理はいろいろありますが、cocoa の流儀ではどうするのかと調べると NSScanner ってのが使えると知りました。
初めて使いましたが、便利ですね。

1
2
3
4
5
6
7
8
9
10
11
12
13
14
15
// 数値入力として妥当か判断する
- (BOOL)isDigit:(NSString *)inString
{
    if ([inString length] == 0) {
        return NO;
    }
 
    NSCharacterSet *digitCharSet = [NSCharacterSet characterSetWithCharactersInString:@"0123456789"];
 
    NSScanner *aScanner = [NSScanner localizedScannerWithString:inString];
    [aScanner setCharactersToBeSkipped:nil];
 
    [aScanner scanCharactersFromSet:digitCharSet intoString:NULL];
    return [aScanner isAtEnd];
}

参考リンク:
terrazzoの日記 ■[Cocoa]Re: NSString が整数値かどうか調べる関数

Apple Push Notification サービス(APNs) の実装方法

プッシュ通知の理解には、以下のドキュメントは、以下のものが参考になる
Local NotificationおよびPush Notificationプログラミングガイド

実装については、以下の公開されているコードが参考になる
・ApnsPHP: Apple Push Notification & Feedback Provider
http://code.google.com/p/apns-php/

・EASY APNS
APPLE PUSH NOTIFICATION SERVICE USING PHP & MYSQL
http://www.easyapns.com/
サーバ(PHP)、クライアント(Objective-C) のコードが同梱されている
また、HP には実装の手順が動画で公開されている(約10分)

今回 検証には、ApnsPHP を使用した。
(EASY APNS は mysqli を使用しているが、私の検証用レンタルサーバで動かなかったため。(T_T))

プッシュ通知を実装するには、以下の作業が必要となる

1. プッシュ通知に対応したプロビジョニングプロファイルの作成とインストール

– iOS Provisioning Portal から “Push Notifications”に対応した”App IDs”を取得する
– App IDs を指定したプロビジョニング ファイルを取得する
– 開発環境、デバイスにインストールする

プッシュ通知には、プッシュ通知に適応したプロビジョニング ファイルを使用する必要がある。
既に作成しているプロビジョニング ファイルにプッシュ通知 属性を付加することができなかったため、
新たにプッシュ通知に適応した “App IDs” を作成し、その ID を指定したプロビジョニング ファイルを取得した。

2. デバイストークンを取得する

デバイストークンとは、iOS デバイスが Remote Notification を受信するために、APNS へデバイス登録を行った際に取得できるID。
(サービス提供者が iOS デバイスへ APNS を介してメッセージ通知する際に利用される)
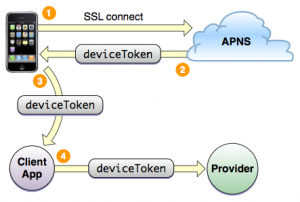
以下のサンプルでは、iOS アプリ起動時に Remote Notification 受信するためにデバイスを登録し、APNS からデバイス トークンを受信している。
(ログにデバイス トークンが出力されるので、PHPスクリプトに適用して利用する)

アプリ起動時などでデバイスを APNS へ登録する

1
2
3
4
5
6
7
// アプリケーションが起動した際の処理
- (BOOL)application:(UIApplication *)application didFinishLaunchingWithOptions:(NSDictionary *)launchOptions
{
    // Remote Notification を受信するためにデバイスを登録する
    [[UIApplication sharedApplication] registerForRemoteNotificationTypes:(UIRemoteNotificationTypeBadge
                                                                           | UIRemoteNotificationTypeSound
                                                                           | UIRemoteNotificationTypeAlert)];

APNS から返されるデバイストークンに付加されている文字をカットする

1
2
3
4
5
6
7
// デバイストークンを受信した際の処理
- (void)application:(UIApplication *)application didRegisterForRemoteNotificationsWithDeviceToken:(NSData *)devToken {
 
    NSString *deviceToken = [[[[devToken description] stringByReplacingOccurrencesOfString:@"<"withString:@""] 
                                                      stringByReplacingOccurrencesOfString:@">" withString:@""] 
                                                      stringByReplacingOccurrencesOfString: @" " withString: @""];
    NSLog(@"deviceToken: %@", deviceToken);

プッシュ通知は、NSDictionary で渡される

1
2
3
4
5
6
7
8
9
10
11
12
13
14
15
16
17
18
// プッシュ通知を受信した際の処理
- (void)application:(UIApplication *)application didReceiveRemoteNotification:(NSDictionary *)userInfo {
#if !TARGET_IPHONE_SIMULATOR
    NSLog(@"remote notification: %@",[userInfo description]);
    NSDictionary *apsInfo = [userInfo objectForKey:@"aps"];
 
    NSString *alert = [apsInfo objectForKey:@"alert"];
    NSLog(@"Received Push Alert: %@", alert);
 
    NSString *sound = [apsInfo objectForKey:@"sound"];
    NSLog(@"Received Push Sound: %@", sound);
    AudioServicesPlaySystemSound(kSystemSoundID_Vibrate);
 
    NSString *badge = [apsInfo objectForKey:@"badge"];
    NSLog(@"Received Push Badge: %@", badge);
    application.applicationIconBadgeNumber = [[apsInfo objectForKey:@"badge"] integerValue];
#endif
}

3. SSL Distribution証明書、秘密暗号鍵の取得とサーバへの配置

SSL Distribution証明書と秘密暗号鍵を、APNsに接続するサーバにインストールする必要がある。

私は以下の手順で証明書、秘密暗号鍵を作成しました。
ネット上にはいくつかの手順が紹介されていますが、以下の資料が一番わかりやすかったです。
結果、以下のファイルが作成できれば OK。

・server_certificates_bundle_sandbox.pem
・entrust_root_certification_authority.pem

How to generate a Push Notification certificate and download the Entrust Root Authority certificate

http://code.google.com/p/apns-php/wiki/CertificateCreation

・CertificateCreation
How to create a Push Notification certificate in iPhone Developer Program Portal

・Generate a Push Certificate
Push Notification のセキュリティ認証情報の取得

・Verify peer using Entrust Root Certification Authority
Download the Entrust Root Authority certificate directly from Entrust Inc. website:

4. PHPサーバ スクリプトの対応

最後に、iPhone へプッシュ通知するコードを用意します。
ApnsPHP の sample_push.php (プッシュ通知用)にデバイス トークンを指定すれば OKです。
また、APNS と通信するので、以下の証明書を配置しておきます。

– server_certificates_bundle_sandbox.pem
– entrust_root_certification_authority.pem

ここまで作業すれば、無事、プッシュ通知できるはずです。
お疲れ様でした。^_^

もし、PHP スクリプトがエラー出力するようであれば、以下の点をチェックしてみてください。
では!

注意:
ApnsPHP (at revision 100) – ApnsPHP-r100.zip に含められている sample_push.php は、
以下のファイル名の綴りが間違っているようです。
私はこれで2分くらい悩みました。。。(T_T)
2分で済んで助かりましたが、運が悪いともっと悩んでいたはず。
恐ろしい罠ですね。

1
2
3
4
5
6
// Instanciate a new ApnsPHP_Push object
$push = new ApnsPHP_Push(
	ApnsPHP_Abstract::ENVIRONMENT_SANDBOX,
//	'server_cerificates_bundle_sandbox.pem'		// 綴りが間違ってる
  'server_certificates_bundle_sandbox.pem'
);
NSCalendar : 月末が第何週目か取得する方法

NSCalendar クラスの ordinalityOfUnit:inUnit:forDate:メソッドが便利だったのでメモしておきます。
例えば、月末が月の第何周であるか?とか調べるのに利用できます。
その他、年内で第何周であるか?とかも調べられるはず。

1
2
3
4
5
6
7
8
9
10
11
12
13
14
15
16
17
18
19
20
21
22
23
24
25
26
27
28
29
30
31
32
33
34
35
36
37
// NSDate にカテゴリでメソッドを追加しておく
@interface NSDate (DateAdditions)
 
// 月の日数を取得する
- (NSUInteger)getNumberOfDaysInMonth
{
    return [[NSCalendar currentCalendar] rangeOfUnit:NSDayCalendarUnit inUnit:NSMonthCalendarUnit forDate:self].length;
}
 
		:
		:
// 月の日数を取得する
NSDate *todayDate = [NSDate date];
NSUInteger lastdayInMonth = [todayDate getNumberOfDaysInMonth];
 
// 本日日付を年月日で分解する
NSCalendar *cal = [NSCalendar currentCalendar];
NSDateComponents *dateComps = [cal components:NSYearCalendarUnit | 
                                              NSMonthCalendarUnit |
                                              NSDayCalendarUnit
                                     fromDate:[NSDate date]];
// 月末日付を取得する
NSDateComponents *comps = [[NSDateComponents alloc] init];
[comps setYear:dateComps.year];
[comps setMonth:dateComps.month];
[comps setDay:lastdayInMonth];
NSDate *lastDate = [cal dateFromComponents:comps];
[comps release];
 
// 月末が第何週目か取得する
NSUInteger lastdayWeekNo = [cal ordinalityOfUnit:NSWeekCalendarUnit 
                                          inUnit:NSMonthCalendarUnit 
                                         forDate:lastDate];
// 本日が月の第何週目か取得する
NSUInteger todayWeekNo = [cal ordinalityOfUnit:NSWeekCalendarUnit 
                                        inUnit:NSMonthCalendarUnit 
                                       forDate:[NSDate date]];

キーボードに入力領域が重ならないようにする方法

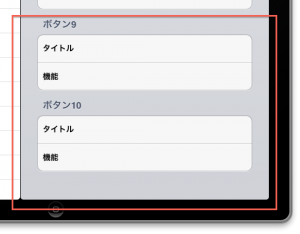
以下の様なテーブル ビューをデザインしたとします。
テーブルのセルにはテキスト フィールドが配置されており、キーボードからの入力が可能とします。

ボタン10のタイトル行などにキーボード入力を行おうとフォーカスを移動すると、画面下部から表示されるキーボードで入力領域が隠されてしまうことになります。

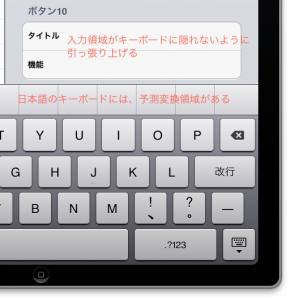
そこで入力領域が重ならないように、以下の様にテーブルを引っ張り上げます。(表現がいまいちですが、通常のスクロールでは移動できない位置にセルを上げ下げします。)
このような表示は、キーボードの表示、非表示時に UITableView の UIEdgeInsets の値を調整することで、編集中セルを画面中央へ移動させることが可能です。
あと、iOS 5 では、日本語キーボードの上部に予測変換候補が表示される仕様となっているようなので考慮しておきます。

手順は、以下の通り
1. UITableViewController でキーボードの通知を取得できるようにする
2. キーボードの表示、非表示に UITableView の UIEdgeInsets の値を調整することで、編集中セルを画面中央へ移動させる

1
2
3
4
5
6
7
8
9
10
11
12
13
14
15
16
17
18
19
20
21
22
23
24
25
26
27
28
29
30
31
32
33
34
35
36
37
38
39
40
41
42
43
44
45
46
47
48
49
50
51
52
53
54
55
56
57
58
59
60
61
62
63
64
65
66
67
68
69
70
71
72
73
74
75
76
77
78
79
80
81
82
83
84
85
86
87
88
89
90
91
92
93
94
95
96
97
98
99
100
101
102
103
104
105
106
107
- (id)initWithStyle:(UITableViewStyle)style
{
    self = [super initWithStyle:style];
    if (self) {
        // Custom initialization
 
        // ソフトキーボードの表示、非表示の通知を登録する
        NSNotificationCenter *center;
        center = [NSNotificationCenter defaultCenter];
        [center addObserver:self selector:@selector(keyboardWillShow:) name:UIKeyboardWillShowNotification object:nil];
        [center addObserver:self selector:@selector(keybaordWillHide:) name:UIKeyboardWillHideNotification object:nil];
    }
 
    return self;
}
 
- (void)dealloc
{
    // ソフトキーボードの表示、非表示の通知を解除する
    NSNotificationCenter *center;
    center = [NSNotificationCenter defaultCenter];
    [center removeObserver:self name:UIKeyboardWillShowNotification object:nil];
    [center removeObserver:self name:UIKeyboardWillHideNotification object:nil];
 
    [super dealloc];
}
 
#pragma mark -
#pragma mark Software Keyboard Mthods
 
- (void)keyboardWillShow:(NSNotification*)notification
{
    NSDictionary *userInfo;
    userInfo = [notification userInfo];
 
    // 1. キーボードの top を取得する
    CGRect keyboardFrame;
    keyboardFrame = [[userInfo objectForKey:UIKeyboardFrameEndUserInfoKey] CGRectValue];
 
    CGFloat keyboardTop = (APP_CONTENT_HEIGHT) - (keyboardFrame.size.height + 55.f );   // 55.f:予測変換領域の高さ
 
 
    // 2. 編集中セルの bottom を取得する
    // テーブル ビューはスクロールしていることがあるので、オフセットを考慮すること
    UITableViewCell *cell;
    cell = [self.tableView cellForRowAtIndexPath:[NSIndexPath indexPathForRow:indexPath_.row 
                                                                    inSection:indexPath_.section]];
    CGRect cellFrame;
    cellFrame = cell.frame;
 
    CGPoint offset = CGPointZero;
    offset =  self.tableView.contentOffset;  
 
    CGRect cellRectOrigin = CGRectZero;    
    cellRectOrigin.origin.x = cellFrame.origin.x - offset.x;  
    cellRectOrigin.origin.y = cellFrame.origin.y - offset.y; 
 
    CGFloat cellBottom = cellRectOrigin.origin.y + cellFrame.size.height + 30.f;   // 30.f:マージン
 
 
    // 編集中セルの bottom がキーボードの top より上にある場合、
    // キーボードに隠れないよう位置を調整する処理対象外とする
    if (cellBottom < keyboardTop) {
        return;
    }
 
 
    // 3. 編集中セルとキーボードが重なる場合、編集中セルを画面中央へ移動させる
    // キーボードの高さ分の insets を作成する    
    UIEdgeInsets insets;
    insets = UIEdgeInsetsMake(0.0f, 0.0f, keyboardTop, 0.0f);
 
    NSTimeInterval duration;
    UIViewAnimationCurve animationCurve;
    void (^animations)(void);
    duration = [[userInfo objectForKey:UIKeyboardAnimationDurationUserInfoKey] doubleValue];
    animationCurve = [[userInfo objectForKey:UIKeyboardAnimationCurveUserInfoKey] integerValue];
    animations = ^(void) {
        self.tableView.contentInset = insets;
        self.tableView.scrollIndicatorInsets = insets;
    };
    [UIView animateWithDuration:duration delay:0.0 options:(animationCurve << 16) animations:animations completion:nil];
 
    // 編集中セルの位置を調整する
    CGRect rect = cell.frame;
    rect.origin.y = cellFrame.origin.y - 300.f;
 
    [self.tableView scrollRectToVisible:rect animated:YES];
}
 
- (void)keybaordWillHide:(NSNotification*)notification
{
    NSDictionary *userInfo;
    userInfo = [notification userInfo];
 
    NSTimeInterval duration;
    UIViewAnimationCurve animationCurve;
    void (^animations)(void);
    duration = [[userInfo objectForKey:UIKeyboardAnimationDurationUserInfoKey] doubleValue];
    animationCurve = [[userInfo objectForKey:UIKeyboardAnimationCurveUserInfoKey] integerValue];
    animations = ^(void) {
        // insets を 0 にする
        self.tableView.contentInset = UIEdgeInsetsZero;
        self.tableView.scrollIndicatorInsets = UIEdgeInsetsZero;
    };
    [UIView animateWithDuration:duration delay:0.0 options:(animationCurve << 16) animations:animations completion:nil];  
}

処理を一時停止する方法

UITableView のセルに UITextField を保持したカスタム セルを用意し、設定値を入力できるようにした。

カスタマイズ UITableViewCell

画面に”登録”ボタンを配置したが、UITextField に設定値を入力編集後、”登録”ボタンを押下し、画面遷移すると設定値が保存されていないという問題が発生した。

原因は、以下の通り。
UITextField の UIControlEventEditingDidEndOnExit コントロール イベントを取得し、編集終了と判断して入力された設定値を保存しようとしていたが、UIControlEventEditingDidEndOnExit の通知を受ける前に”登録”ボタン押下時の処理が行われていた。
結果、編集した設定値を保存する前に画面遷移が行われていたのが問題だと分かった。

というわけで、
(対処前)”登録”ボタン押下処理 → (変更前の)設定値 保存 → UITextField 編集終了の通知
(対処後)UITextField 編集終了の通知 → “登録”ボタン押下処理 → (変更後の)設定値 保存
“対処後”の順番で処理が行われるように、NSRunLoop クラスを利用して UITextField 編集終了の通知を受けるまで、処理を一時停止するようにした。

1
2
3
4
5
6
7
8
9
10
11
12
13
14
15
16
17
// 登録ボタンが押下された際の処理
- (void)registerButtonAction
{
    // 編集終了通知が受信されるまで待つ (0.5秒間隔で受信確認する)
    while (!didEndEditingFlag_) {
        // ソフトキーボードが表示されている場合、非表示にしないと編集終了通知がされないため、非表示とする
        [editingTextField_ resignFirstResponder];
 
        // 処理を一時停止し NSRunLoop へ制御を戻す
        // 0.5秒後、処理を再開する
        [[NSRunLoop currentRunLoop] runUntilDate:[NSDate dateWithTimeIntervalSinceNow:0.5]];
    }
 
    // 設定情報マネージャへデータを保存する
    [self writeSettingManagerValue];
     :
     :